Before you begin, it is wise to have a backup of any lengthy text that would be hard to replace.
- access the editing screen for the page you want to add the image to
-
CAUTION: To make sure you do not lose any text on the page you're working on:
- Activate cursor where you want the image to appear.
- Hit your Enter key twice. This will add some empty space for your image.
- Place cursor in the center of the empty space
- click the Insert Image icon (looks like mountains & sun)

- Select your image
- The image inserted will show as a large sized-image, 550 pixels in largest dimension.
- Save
You can make the image smaller by dragging in on one corner.
You do not want to make this 500 px image larger in this screen. It will not be sharp!
To make image larger use Full Screen mode and select Insert Original Image.
(steps below)
If you are in the Full Screen Mode (button on upper right of Description text box), once you select the image:
- A window will pop up with three ways to add an image:
- Add a New Image from Your Computer
- Use an Image that you've already uploaded
- Use an Image from the another Website
- click on your preference
- locate your image in the list of images
- click on the thumbnail to select it
- click 'Insert Medium Image', 'Insert Large Image' OR 'Insert Original Image'
- click Save or Save and Exit
Insert Medium Image: the image will show as a medium sized-image
300 pixels in largest dimension.
Insert Large Image: the image will show as a large sized-image
550 pixels in largest dimension.
Insert Original Image: the image will show as large as the original image you uploaded.
To resize the image in Full Screen:
- click on the image to select it
- click on Image Options icon
- for Dimensions field add desired pixel dimension to ONLY one field.
The other dimension will automatically adjust. This will assure that picture is re-sized proportionately. - click Ok
- click Save and exit (upper left)
NOTE: Do not make the 300 or 550 pixel images larger. They will not be sharp.
If you want to show an image larger than 550 pixels, you will need to Insert Original image and then size it down (in most cases).
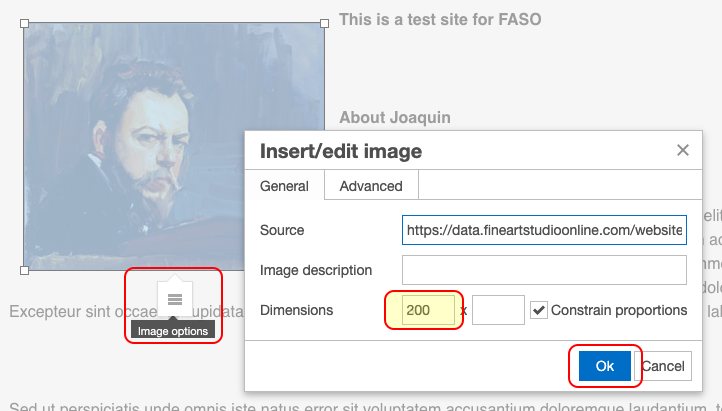
NOTE: If your browser shows little white boxes all around the image, you can choose to drag one of the corner boxes to resize the image.
Also see this FAQ:
How do I determine the image file name/number for a specific image?
07152026